Synology: DSM Configuration
A friend of mine got a Synology recently and asked me how I configured my DS920+.
Figured I’ve might as well create a series of blog posts, covering simple DSM configuration tweaks to more advanced topics like best practice Docker containers using non-root or automated certificates using DSM reverse proxy.
This is the first of the series, where I show how I’ve configured DSM to my liking, with some tips and explanations.
Storage Manager
After you create your first volume during initial setup, there are a couple of settings you’d want to tweak.
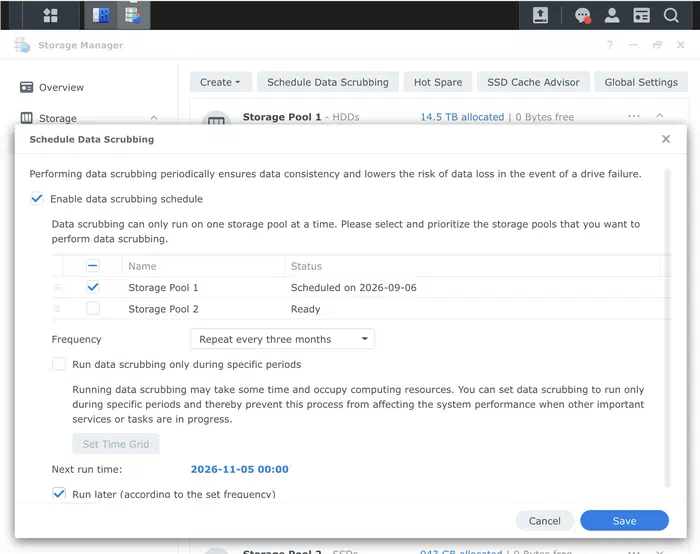
Data Scrubbing
As volumes in DSM utilizes BTRFS, you’d want to enable periodic data scrubbing for catching and self-healing corrupt files.
You’d also need to toggle
Enable data checksum for advanced data integrityduring share creation in Control Panel for self-healing and scrubbing to work on that volume.
Global Settings
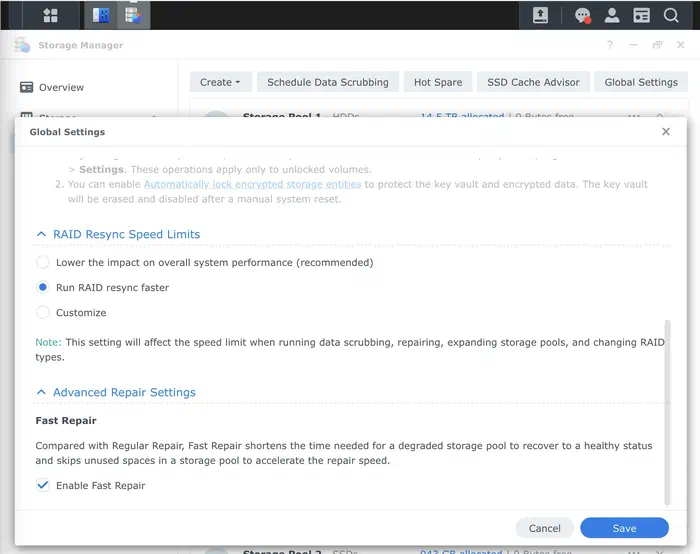
Under Global Settings you can toggle Run RAID resync faster and Enable Fast Repair for removing the speed limit during changes to storage pools.
For the average home user this makes sense to toggle, as you’ll want to prioritze faster repair of storage pools for ensuring redundancy over performance with few simultaneous users.
Volume Settings
Under the three-dots menu for a volume, there is a separate Settings button
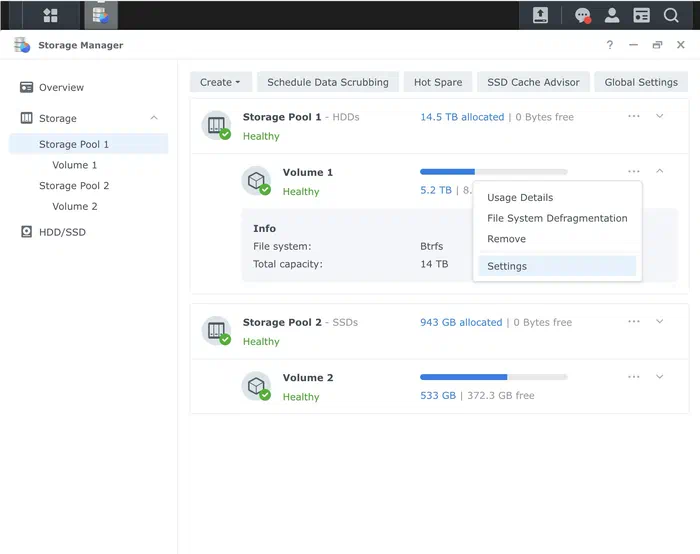
Here you can disable Record File Access Time which grants improved performance by not writing access metadata to files, in Linux terms this is basically noatime in fstab.
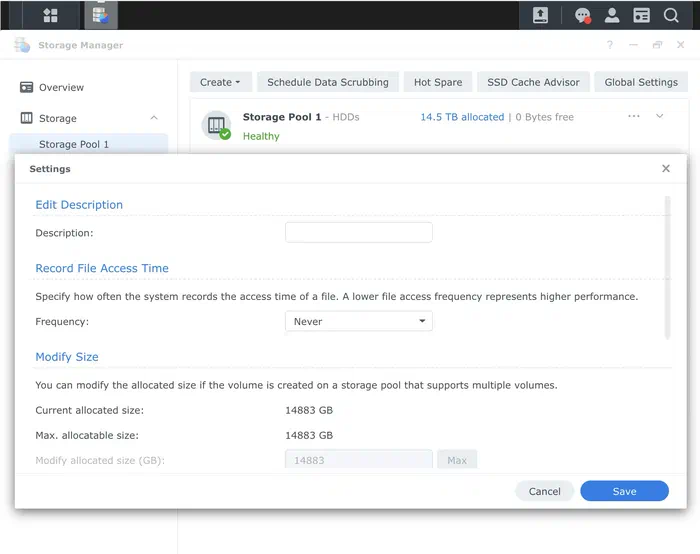
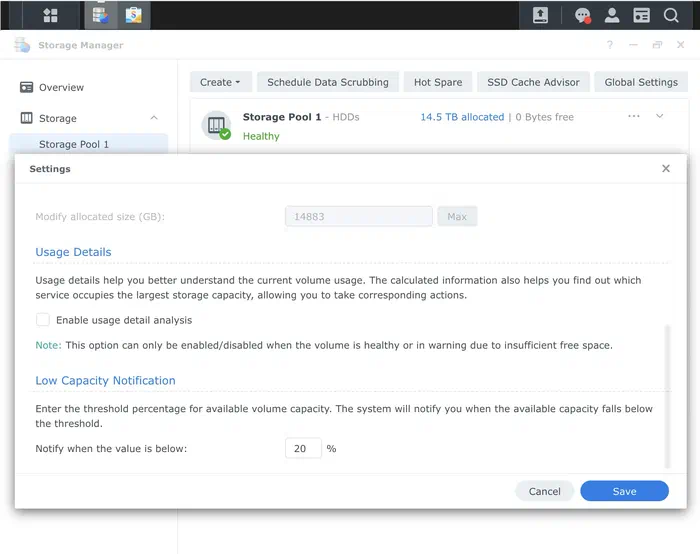
You can also disable Enable usage detail analysis, as this is not really useful. Since the package “Storage Analyzer” available in Package Center is what you’d really need when volume is filled up.
Adjust the Low Capacity Notification to what you are comfortable with, I keep it at 20%
S.M.A.R.T Tests
Yuge disclamer first, NVMe SSDs are not included in scheduled S.M.A.R.T. tests in DSM. No good reason for this, only HDDs are scanned. I’ll include a workaround in a separate blog post encompassing NVMe volumes.
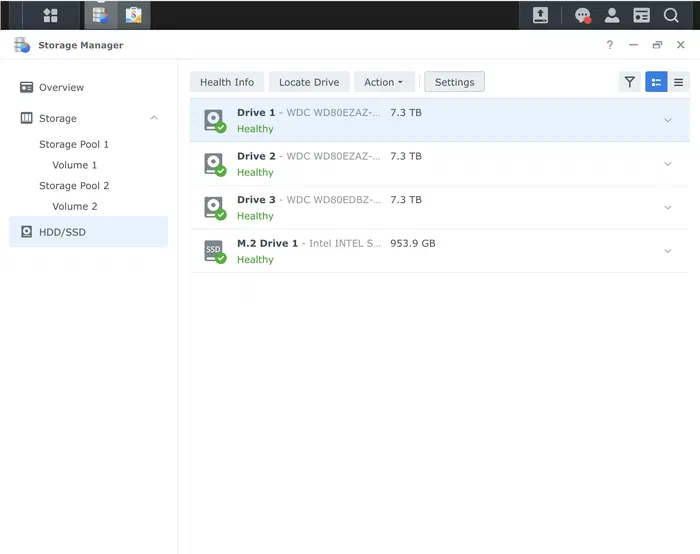
Under HDD/SSD in the sidebar, you can list all available drives. Open up Settings
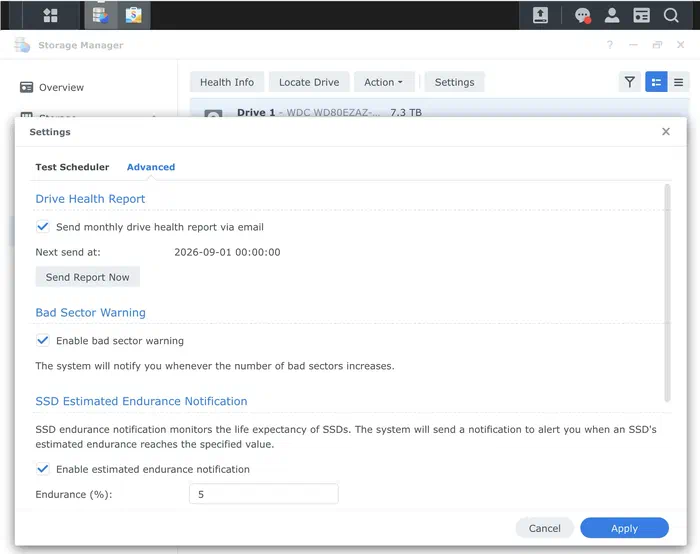
First, let’s edit the Advanced settings, mine looks like this:
Then we can add two jobs under Test Scheduler, one for a daily job and one for a monthly one.
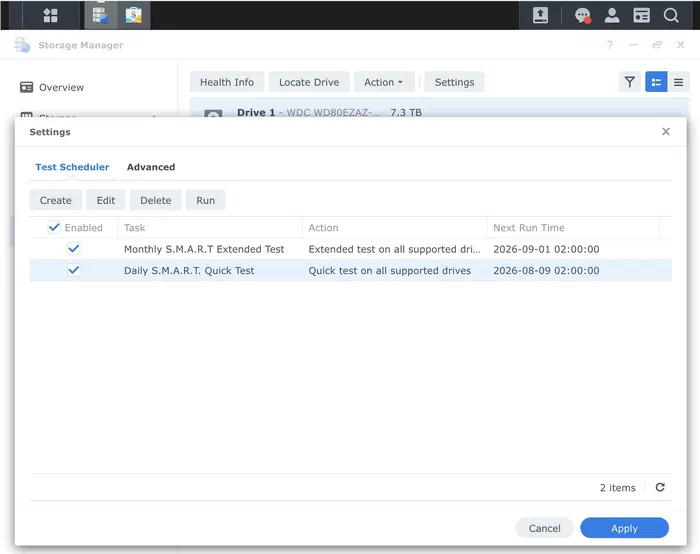
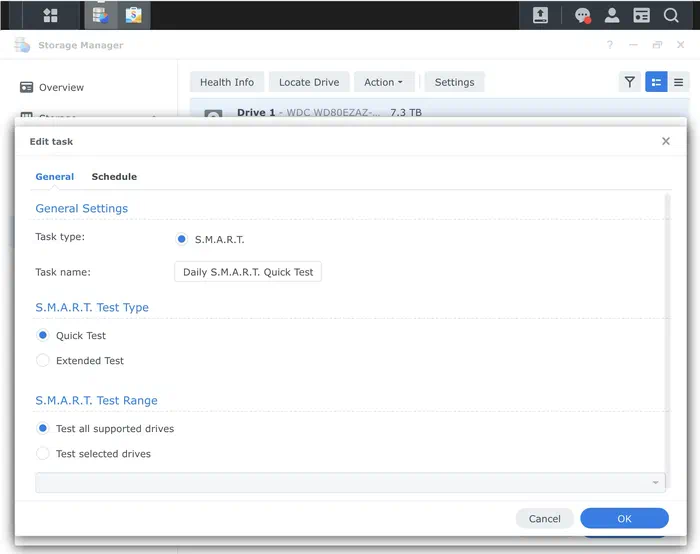
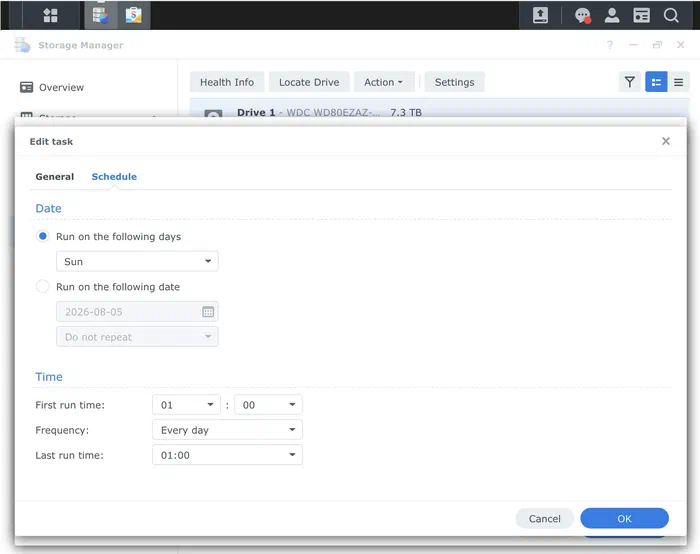
My daily task looks like this
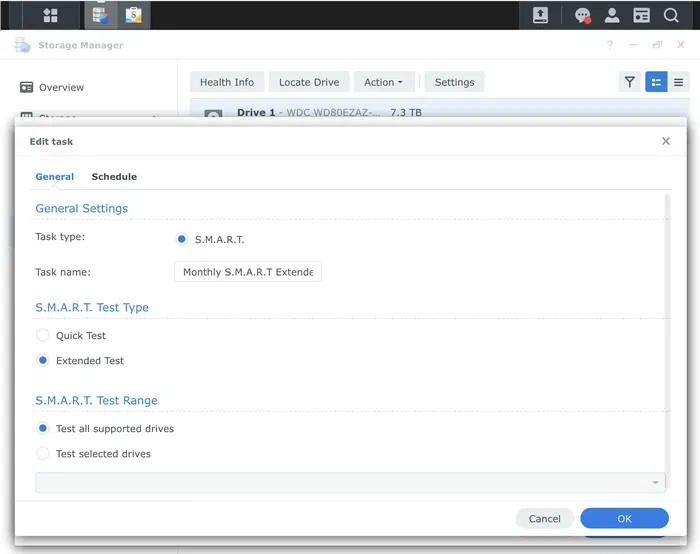
And my monthly extended task looks like this
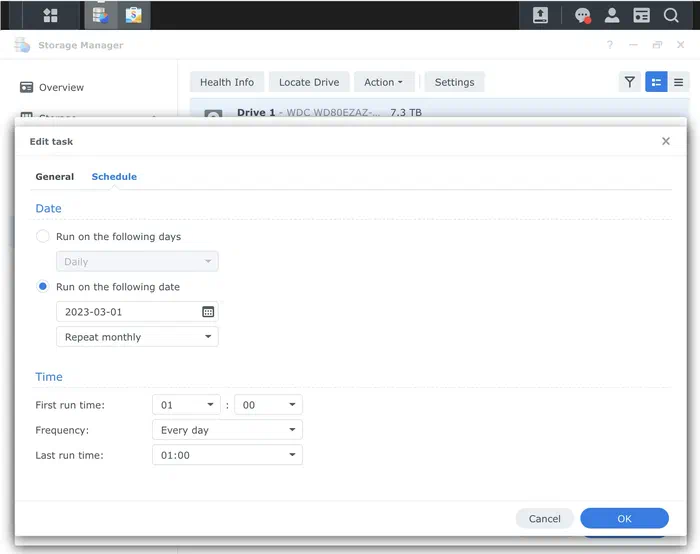
Disk self-checking should be configured properly.
Story time
How does a S.M.A.R.T. detected error look like in Synology you ask?
- The NAS unit will produce a audible beep alert.
- You’ll then see disk 2 light is orange.
- Then you’ll check your email, here you can see that there was a error with disk 2 and it has been detached from the Storage Pool.
- This is where it gets a bit silly, as there is no way of reading S.M.A.R.T. error logs directly from DSM, you’ll need to SSH into the NAS and run the following commands.
blkidfor figuring out the device namesmartctl -d sat -a /dev/sata2for viewing the S.M.A.R.T. summary.
- In my case, I saw the ICRC meaning connector or backplane error. A reseat of the drive and some dust cleaning sorted it out. Been running this drive for another year without issues.
If the disk died, then I would need to replace the disk with similar or larger capacity drive and head into Storage Manager for adding the new disk to the Storage Pool. A rebuild of the RAID array would take around 2-3 days for a new 8TB disk.
Package Center
This is a pretty simple tip, remove all packages that you’re allowed to remove when first setting up DSM. You can add the ones you want afterwards, keeps the system lean.
As there are a few packages that eats up some resources without any benefit, like Active Insight, we don’t like that package.
What packages do I currently have running?
- Storage Manager
- Tailscale
- Hyber Backup
- Synology Application Service (Dependency for: Synology Drive Server)
- Hybrid Share (Unused, not removable)
- QuickConnect (Unused, not removable)
- Node.js v20 (Dependency for: Synology Drive Server)
- Synology Drive Server
- Universal Viewer
- Snapshot Replication
- Active Backup for Business
- Container Manager
- File Station
- SMB Service
- Replication Service
- Python2
- SAN Manager
- Secure SignIn Service
- Universal Search
Auto Update
Under Settings you can tweak Auto-update to your preference, I keep mine at Auto-update all packages to the latest versions. As I prefer to keep packages (not OS) up-to-date.
Resource Monitor
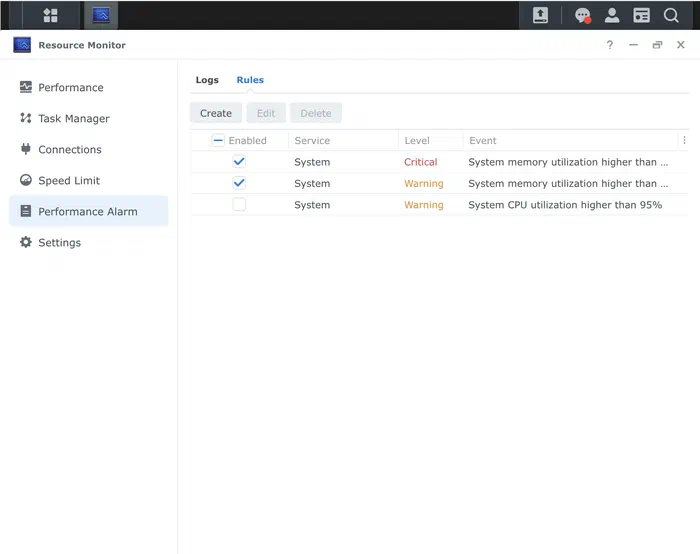
There are two things you’d want to tweak in Resource Monitor, first is under the Performance Alarm.
Performance Alarm
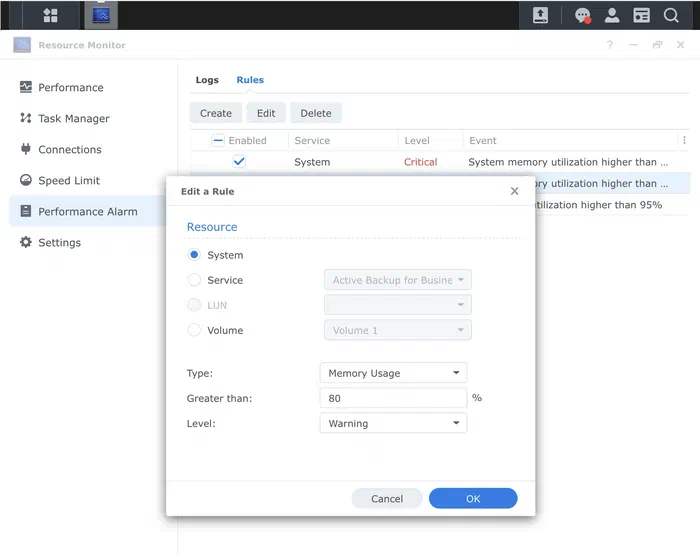
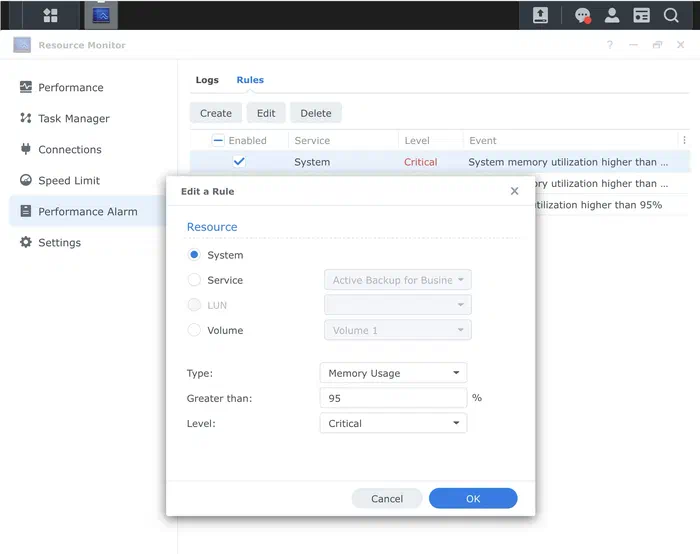
I’ve disabled the CPU alert as this will just fire every-time you burst above x% CPU (not average), but kept two rules for memory to get a email when I’m closing into out-of-memory shenanigans.
Settings
You can disable Enable usage history to free up some resources, as this would write metrics to a database on all storage volumes.
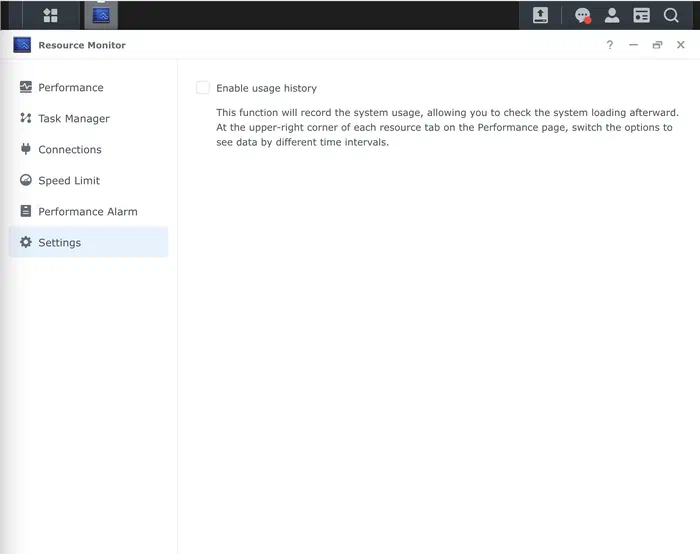
When disabled, the Performance graphs will still work, but will be reset when you refresh the page.
During some activities you’d might want to enable this temporary. For example when implementing Docker containers for the first time, just to monitor the resource usage historically.
Control Panel
Shared Folder
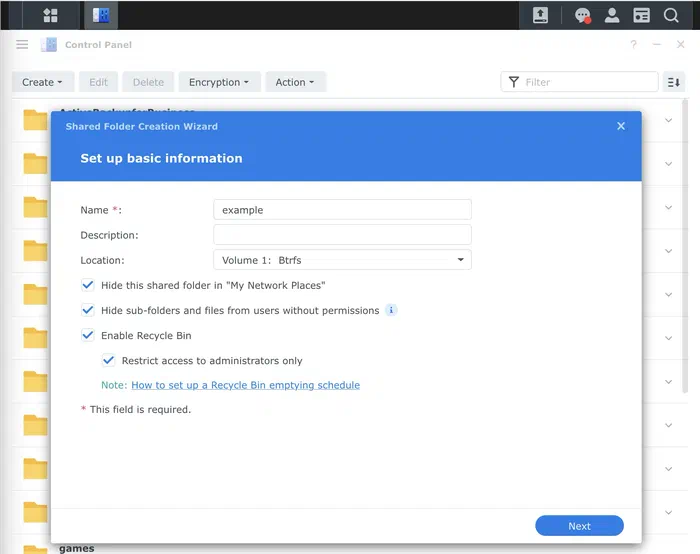
Let’s create an example share with some tips and explanations.
I use Hide this shared folder in "My Network Places" and Hide sub-folders and files from users without permissions. This would ensure users with only access to a share will see the folder when browsing all shares available over Samba.
Enable Recycle Bin is optional, useful if you expect silly humans to accidentally delete files. “Recovery” can be done using File Station.
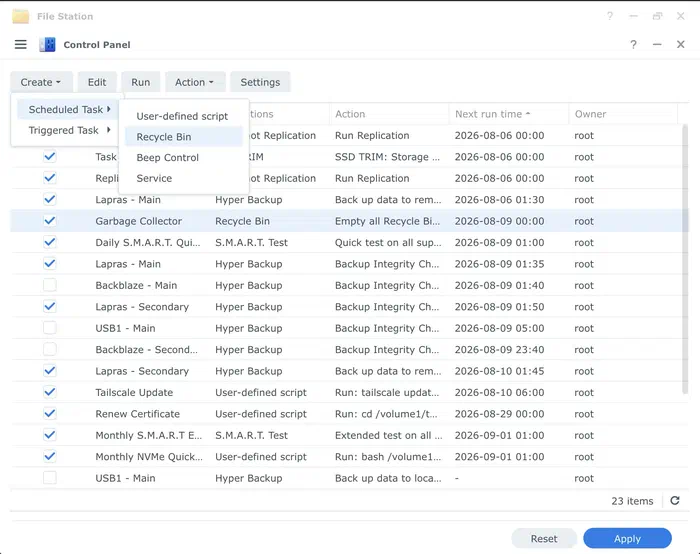
We’ll create a scheduled task later for emptying all recycle bin periodically.
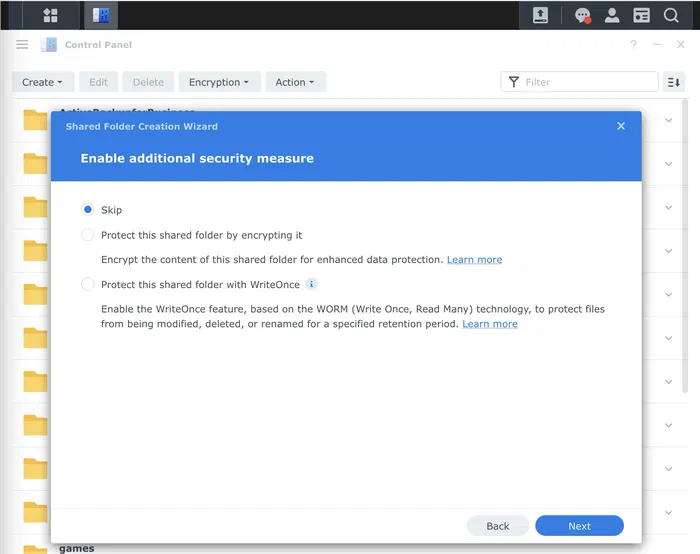
It’s not recommended to use share folder encryption, as this is the legacy method which uses an overlay filesystem (ecryptfs) with performance issues and file path limit of 143 characters.
If you want encryption, use Full Volume Encryption, this is an modern implementation and is more like FileVault. And has a file path limit of 255 characters.
tl;dr: skip
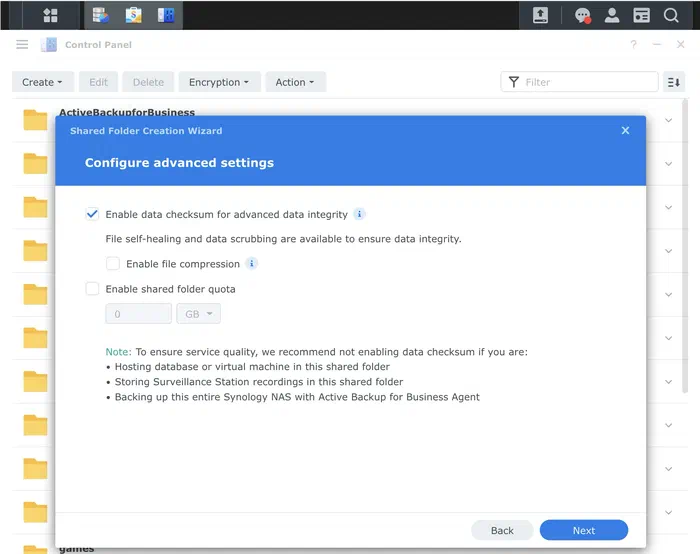
The Enable data checksum for advanced date integrity option should always be enabled for files you care about, this is where data scrubbing comes into play, where files are self-healed when scrubbing detects that a file became corrupt.
It is not possible to enable this after the share is created. That would require to create a tmp share, move the files, recreate the share and move the files back.
The Enable file compression could be useful for some cases, if you have a cold storage of non-compressed files like RAW photos then this would save you some space at the cost of read/write performance and CPU usage.
For already compressed files, this does not make sense. So no need to enable it for a share containing media files.
File Services
To summarize the available methods:
- SMB is the best way of accessing network shares for Synology users.
- AFP is dead, don’t use that.
- NFS is fast, IP allowlist, shares allowlist, squashing to guest/root only. Useful for a separate server for storing persistent data on NAS, with some UID/GID permission quirks. Not good for backups, bad fit for accessing existing folders on NAS.
- FTP/SFTP is there if you are feeling nostalgic.
- rsync is the way for push based backup to NAS, however personally I’m more fan of Active Backup for Business, which is pull based backup for avoiding credentials on the target.
SMB
I’ll only focus on Samba aka. SMB as this is the main way of accessing data.
For the main SMB page, make it look like this
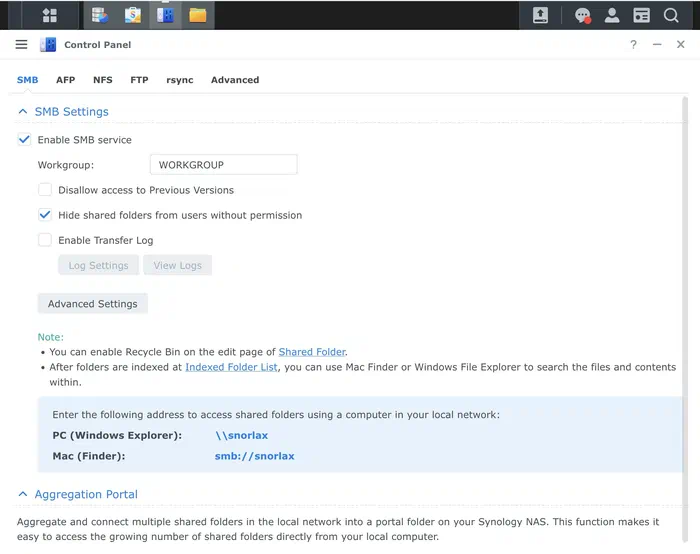
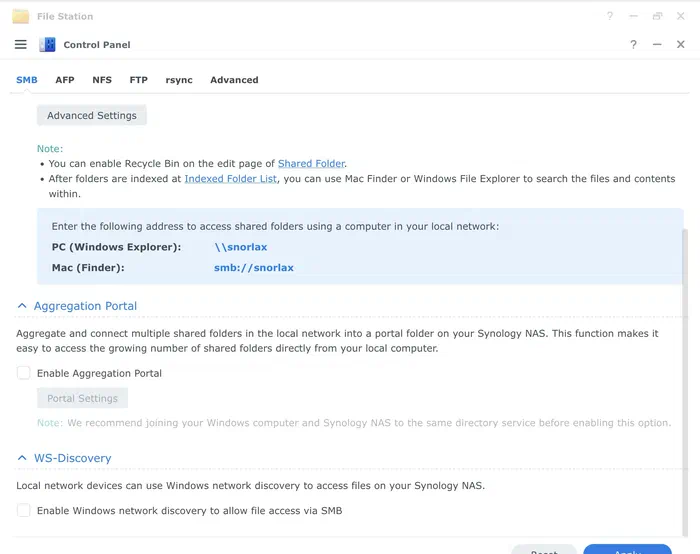
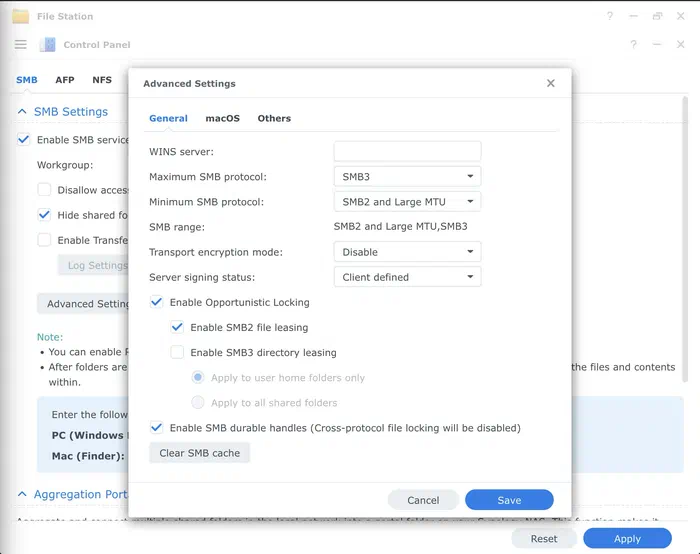
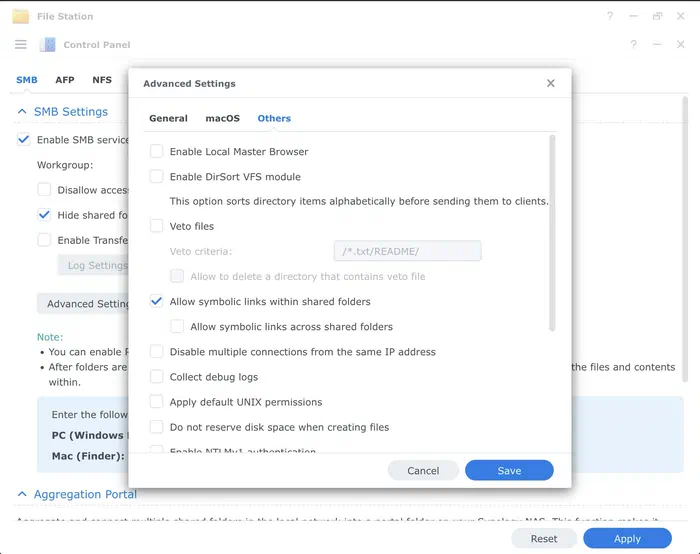
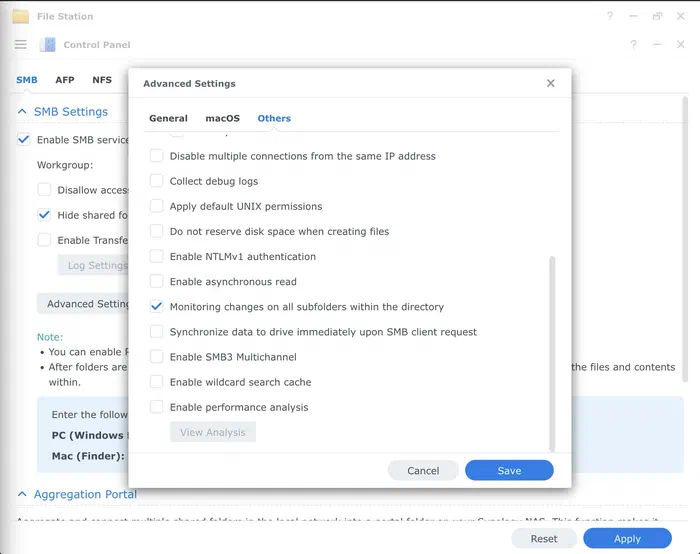
Advanced settings is where we start tweaking.
I’m using a MacBook for accessing the NAS, so some tweaks are for MacBook. If you are on Linux, double check that the settings for possible performance regressions. If you are on Windows, lol.
- Multi-user access to shared photos and files.
- I focus slightly more on stability than performance.
- No encryption as I somewhat trust my LAN setup.
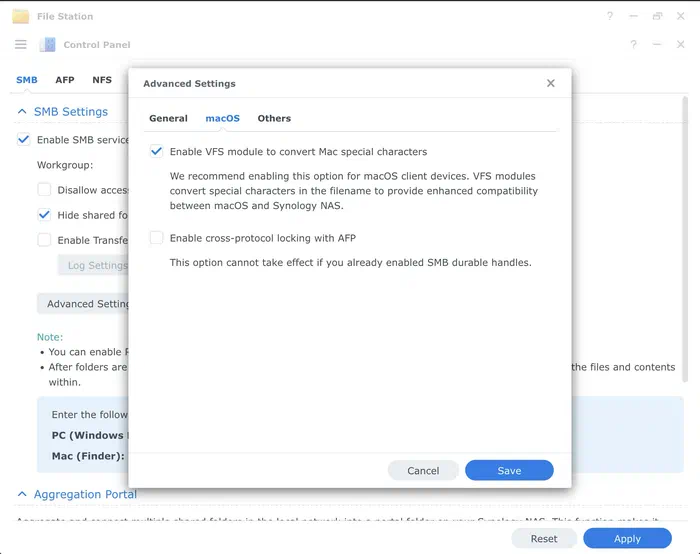
Advanced
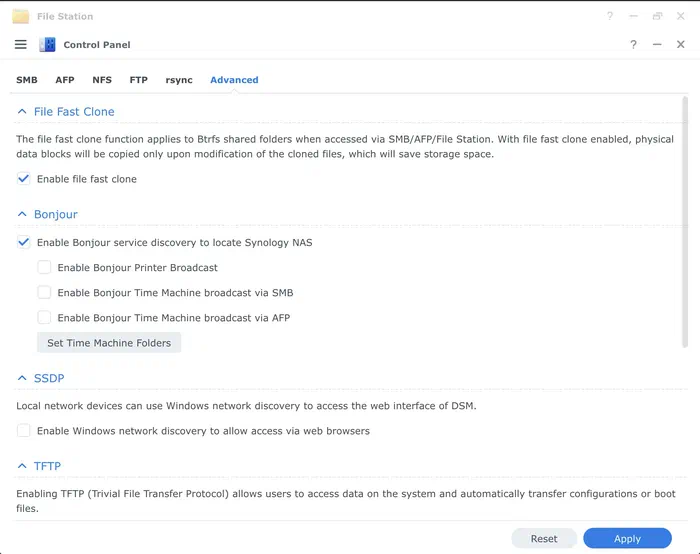
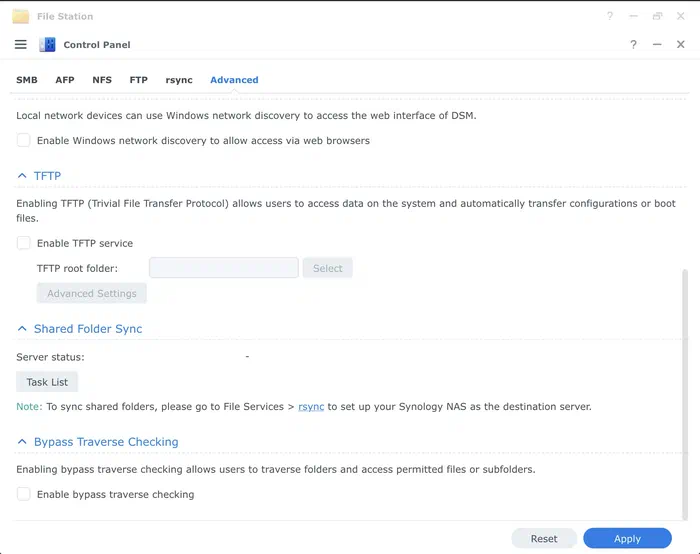
Last up under File Services is Advanced settings.
User & Group
First up, always create a separate superuser from your personal less-privileged user. You don’t need all that access when just accessing data, it’s just proper POLP to do so.
I recommend to create a humans group for common access to shares, as the default users group is added for all users. Which is not cool when you start creating machine users for containers. (Containers will be a separate blog post.)
Under Advanced, you can tone down on the crazy password rules and enable the Enable user home service, which will generate a home dir for all users under a auto-generated homes share.
Security
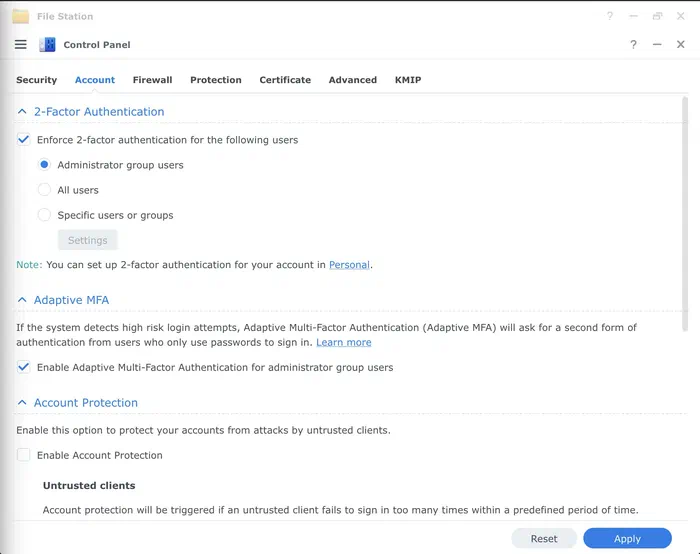
I’ll just dump screenshots of my security settings.
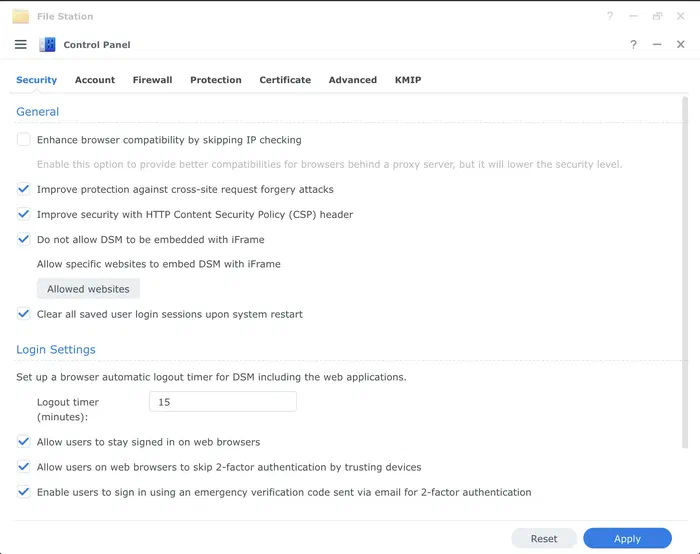
Only the humans group are required to 2FA.
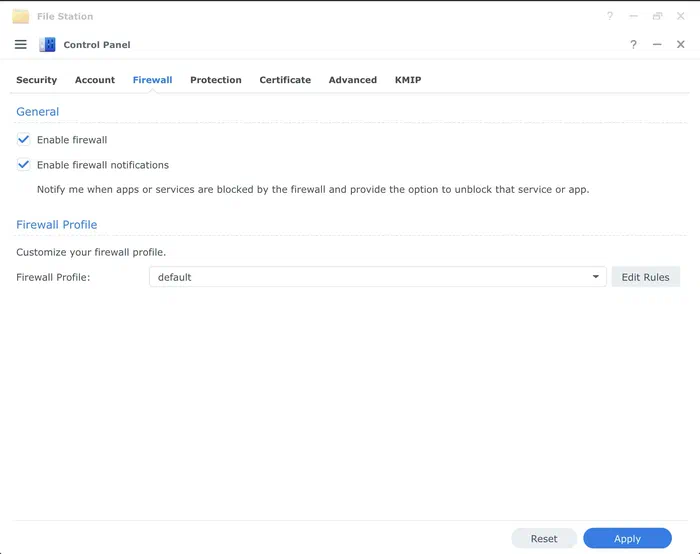
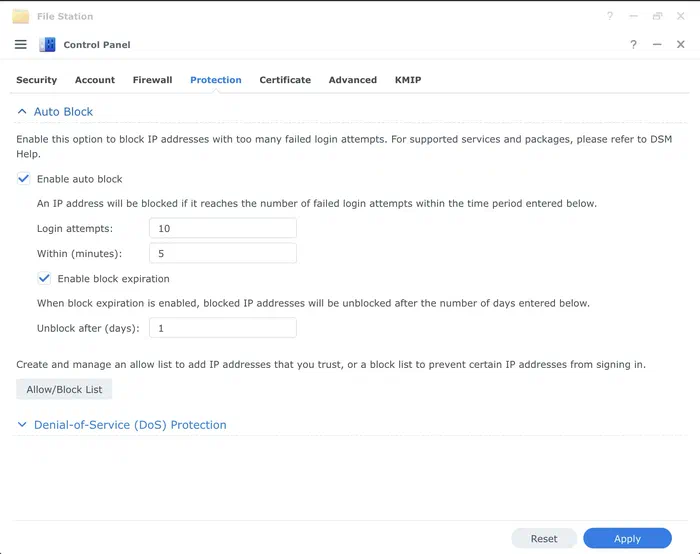
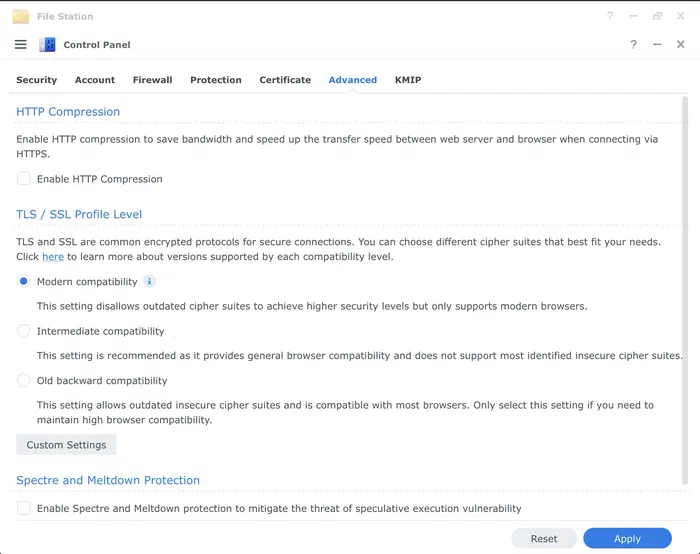
Certificates will be covered in another blog post, TBD.
Terminal & SNMP
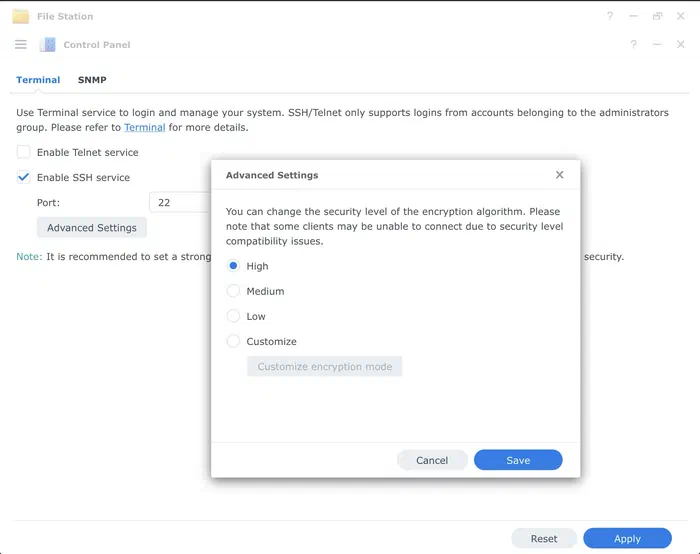
I’ll enable/disable the SSH service on-demand. In everyday usage, this is not needed. Only during configuration and debugging.
It’s best to leave SSH disabled when unused.
Login Portal
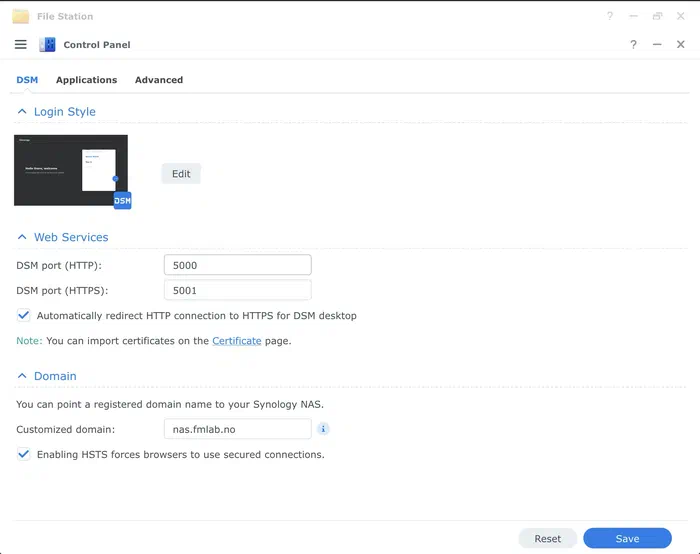
My settings looks like this, the domain record is a A record pointing to the IP address. More on that in another blog post, TBD.
Hardware & Power
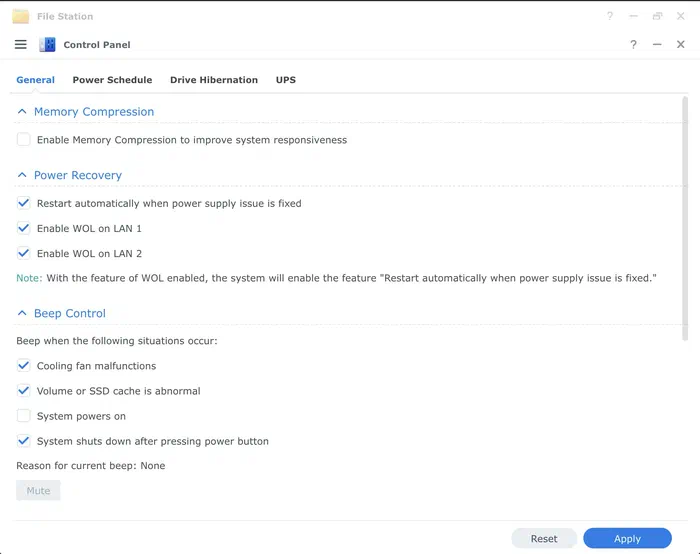
Memory Compression is fine for configurations with low memory, if you have a model with more memory or have added another memory module then its better to disable this.
Device Hibernation
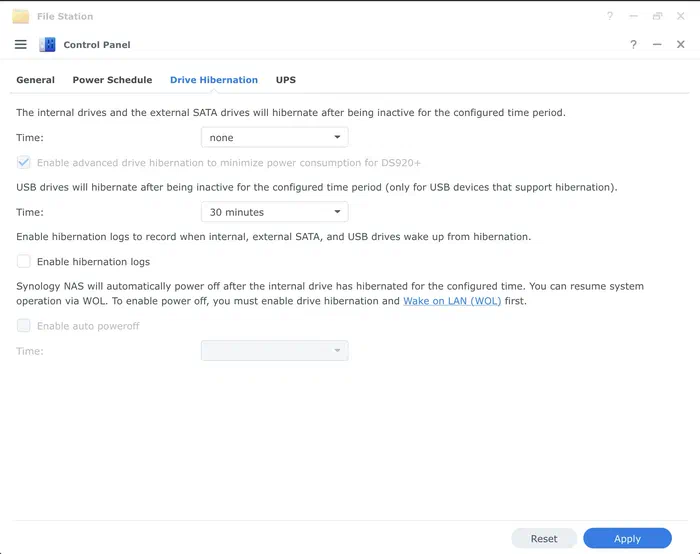
Drive Hibernation is a heated topic online, I won’t cover that. But, there is a bunch of things in Synology DSM that would force a drive to keep spinning.
And even if you remove all packages, turn off settings, DSM will still need to occasionally write to disk as the OS is stored across all drives.
If you want to chase down stuff that wakes the HDDs, you can Enable hibernation logs.
I just keep the disks spinning, have enough containers running for them to be awake all the time anyway.
UPS
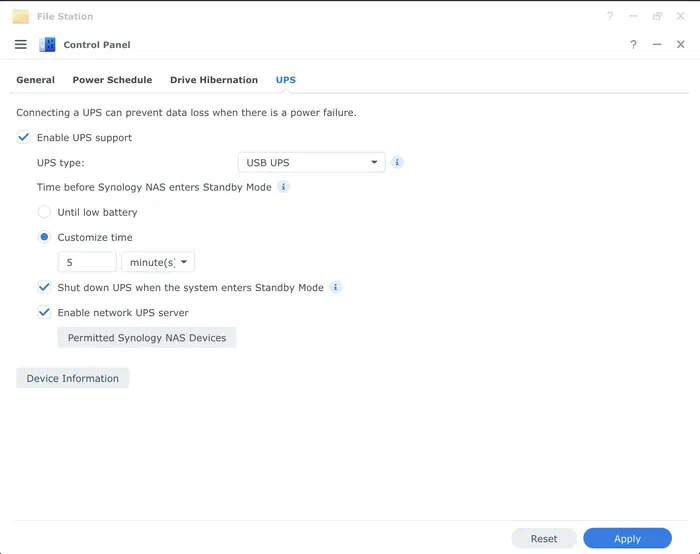
UPS is kinda essential when one got a NAS running 24/7.
I prioritize shutting down earlier to protect data, instead of letting it run for as long as possible. So I have configured it to 5 minutes, as outages are rare here.
I have Enable network UPS server and configured my Intel NUC server to follow my NAS shutdown schedule.
Update & Restore
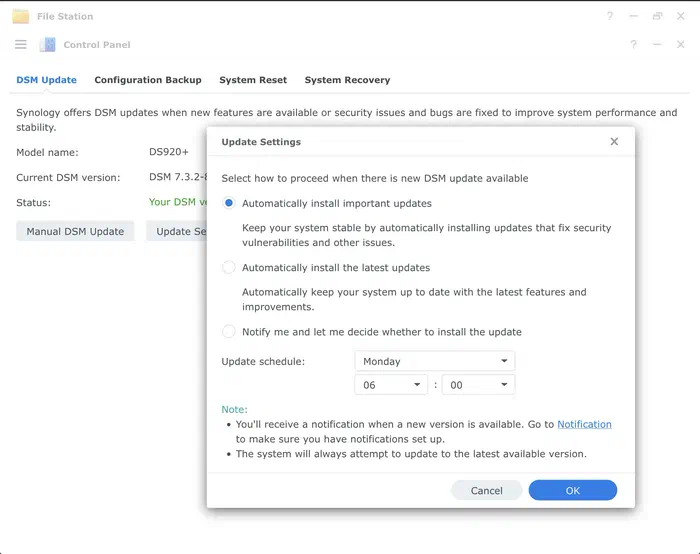
I keep my DSM on Automatically install important updates, sure Synology might remove codecs etc. But, I’d rather workaround that and keep my OS patched.
System Reset
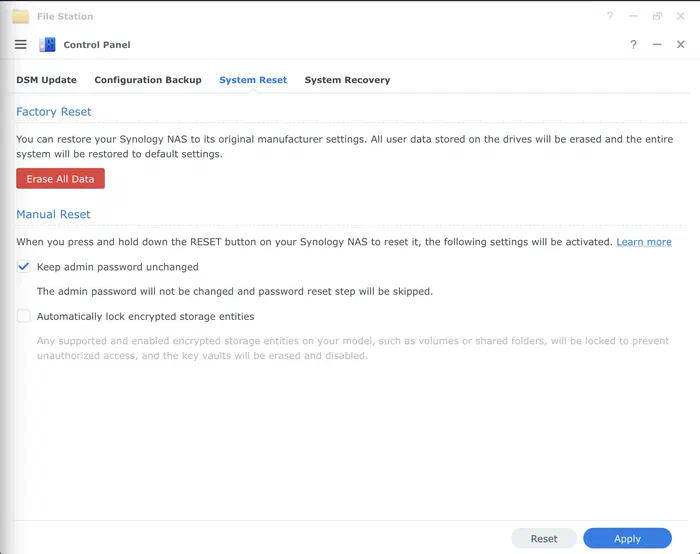
Ensure that Keep admin password unchanged is enabled.
Synology Account
Is required for Active Backup for Business, so I’m logged in.
If you don’t want to login, then use rsync for backup of other systems, and you won’t miss anything.
Task Scheduler
I got a bunch, and you will soon too.
But for now, you can add the default Recycle Bin task under Scheduled Tasks.